Thursday, February 14, 2013
Edna's Heart is full.
Who doesn't love Edna! Here she awaits her Valentine. I used the heart punches for each size heart. Love birds are in their own cage just tweeting away for each other. I also used another punch for the edge..little hearts all around. Age does not matter to Edna . She lives her life to the fullest. She is one of my entries for Art Impressions. I used colored pencils to shade her in.
Friday, February 8, 2013
Be My Valentine
Good Morning everyone.
Thought I would have sunshine today but I guess you can't count on the weather. This is my secone entry for Art Impression challenge this week. I am leaving tomorrow for a long weekend and did not want to miss my chance to get my entry done. My supplies included the red glidder card stock from Celebrations by DC, the printed card stock is loose paper I had in my supply and don't know who made it. All I did was cut out heart designs with a Stamping Up heart punch, butterfly punch from Stamping Up, the oval scallop punch from Stamping Up, and the bird punch from Stamping Up. I cut enough hearts so that I could glue two together so both sides would be the same. I cut my red card stock to fit the card. When the heart shapes were dry , I folded them in half and then glued them in a circle. I placed the red button in the center. My next step was to punch out the bird and place it on dementions and sat him on the branch. His wing is from the design paper. I cut the butterfly's with the stamping up embosslits . I placed thm on the card stock . I typed the greeting on my computer and punched it with the scallop punch. I also used the small butterfly stamp from the Stamping up "So Happy for You " . I have a small heart punch and placed them in the dip in the scallops. Inside the card is two hearts using the background paper and a greeting saying "You and Me Forever". Have fun and have a safe weekend.
Thought I would have sunshine today but I guess you can't count on the weather. This is my secone entry for Art Impression challenge this week. I am leaving tomorrow for a long weekend and did not want to miss my chance to get my entry done. My supplies included the red glidder card stock from Celebrations by DC, the printed card stock is loose paper I had in my supply and don't know who made it. All I did was cut out heart designs with a Stamping Up heart punch, butterfly punch from Stamping Up, the oval scallop punch from Stamping Up, and the bird punch from Stamping Up. I cut enough hearts so that I could glue two together so both sides would be the same. I cut my red card stock to fit the card. When the heart shapes were dry , I folded them in half and then glued them in a circle. I placed the red button in the center. My next step was to punch out the bird and place it on dementions and sat him on the branch. His wing is from the design paper. I cut the butterfly's with the stamping up embosslits . I placed thm on the card stock . I typed the greeting on my computer and punched it with the scallop punch. I also used the small butterfly stamp from the Stamping up "So Happy for You " . I have a small heart punch and placed them in the dip in the scallops. Inside the card is two hearts using the background paper and a greeting saying "You and Me Forever". Have fun and have a safe weekend.
Thursday, February 7, 2013
My heart beats for you.
Good afternoon my friends. Congratulations to last weeks winner of the Art Impressions Challenge. I'm back at it again this week. I just like the fact that its a challenge. This time its for a lot of red so here is my first entry. I used "Dotty" from the Golden Oldies again. She just loves to dance and now she is dancing for my husbands Valentine card. I used the card stock I had on hand and there is no label to say what book I got it out of but I liked the glitter . It made it look like a ballroom. I stamped "Dotty" on Whisper white card stock and a small piece of red card stock that comes in the small 4 X 6 packs. I also punched a bunch of red hearts . I drew a drum on white card stock , applied glitter to the top of ( the sound surface) and added hearts to the sides and in all the glitter circles on the back card stock. I cut the dress out of the red card stock , fitted it to "Dotty" and added a glitter heart to her chest and rhinestones to her skirt. I added my label as a heart . I punched the tiny hearts from another punch set I have and glued them on the white heart. It did not take long to do. Wish me luck in the contest. I'll be back later for my next entry.
Tuesday, February 5, 2013
Night at the Bed and Breakfast
I figured since I showed the other two Picture's I just as soon ad the third. If you did not read the other post, I love the girlfriend stamps from Art Impressions. I use them a lot. This picture is the third in a set that I am doing for my cousin. I always stamp the ladies on whisper white card stock. I colored them with wooden color pencils , cut them out and set them aside. I chose the card for the background and went to work on the sketch. I have never stayed in a bed and breakfast so I am not sure what the room would look like . I like old things so I decided I would sketch in some things I could picture. I placed the girls down to mark my area location . I sketched two end tables and two lamps. I put a cabinet of sorts and a book unit. I put in a window and then of course put the books on the shelves. I colored everything in , cut a rug from another piece of scraping paper and then using dimensions I put the sofa back into the scene. My cousin works for a Bed and Breakfast so I hope she appreciates it. Now back to my card making.
Cajun Hot house.....
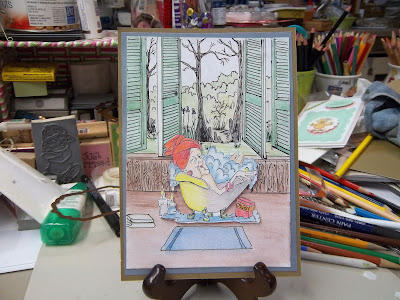
Isn't Edna beautiful in her new spa? ! Ha. I made this picture for a cousin of mine. She remodeled her bathroom and asked if I could do her a set of pictures so this is one of them. I really like this one. I of course stamped Edna on whisper white card stock. I then colored her in with colored pencils and used mineral oil to smooth the pencil marks . I cut her out and put her aside. I then chose a shade of brown card stock for the background and added a medium blue card stock on top of that. The last was whisper white card stock. I placed Edna where I wanted her and made a few clue marks and then put her back on the side. I sketched a floor line and the mind took over from there for the rest of the scene. I love louvered window shutters and would love a room with just that for windows so what better. I sketched in the two side sitter's and then the center ones. I sketched the swamp scene in next. My next art work was the wall below the window and then the floor. I went over everything with a black sketching pen and then colored in with the crayon pencils. ( I always sketch with a lead pencil and then go over with the sketching pen.) I put in a floor mat near the tub and some towels . I just like the whole thing and I think my cousin will be pleased.
Monday, February 4, 2013
You have to love the out house when there is a need.
I did this picture of a cousin of mine. I love the Girfriend stamps from Art Impressions. I chose two of the girls . I stamped all 4 of them on white card stock and then on other designer paper. I cut out the jacket and pants from one design paper. I next then did the skirt and blouse for the other girl. I glued them to the women and then I colored them with crayon pencils. I put demintions on the back and then set them on the card stock I had chosen. I knew where I wanted them placed and then started my sketch. I drew the out house , added grass , a fence in the background , trees in the back ground and then a large oak tree to the left. I marked the walking path from the out house. I lightly colored the picture just for tint. I next placed the ladies where I wanted them. This picture is for my cousin's bathroom. The brown card stock is 5 and 1/2 by 7 and 1/2. The light gray cardstork is 5 X 7.
Saturday, February 2, 2013
Chistening Card for a little girl.
This has been one of my neatest cards. This was a special request from a friend. I have made several cards for her . It was a challenge in one was but an experiment in another . I had a standard card. I wanted this card for a little girl so I chose a pink background card stock. I used a punch from Stamping up on the right edge. I next used whisper white card stock and used the dotted embossing card on it. I placed it over the pink card. Next I again cut out another piece of white card stock and used another embossing folder from Stamping Up. Both of these folders make beautiful back grounds for babies , boy or girl. I glued those to the dotted card stock. I cut a square pink card stock next and fitted the white into the pink . I used the little curve punch on the corners and put tiny pink brads. You can see the placement of the pieces. When I make a card I don't always use ruler measurements . I eye everything to see how it will fit. It makes is a bit difficult to give instructions but you may come up with a design of your own. The stamp set is the Christening set from Stamping up. I enjoyed making the card. The little girl was Christened today at 4:00 p.m. mas at St. Philomena Church in Labadieville.
Thursday, January 31, 2013
Happy Easter
Another entry for Art Impressions. One of my favorite ladies again. This time she is celebrating Easter. I used yellow striped design paper for my background. I stamped the lady twice , once on whisper shite card stock and the second time on design paper. I colored her with Stamping Up pens and then cut her out. I cut her dress off the design paper and glued it to her . I next put dementions on the back of her and put her on the card. I used the same design paper for the eggs and placed them at random on the bottom of the card, Inside I put "How do you want your eggs..scrambled or sugar coated?". Another card to make.
Hi again. I made this card at Christmas this past year. I love the stamp selection from Art Impressions. This beautiful woman is dancing "like no one is watching" and having the time of her life. I am going to use this card in the Art Impression weekly contest. I used standard card and attached a sheet of design paper to the front of the card leaving 1/8 of an inch on each side. I stamped two trees on the design paper . Next I stamped my dancing lady on to whisper white card stock and then ontgo this gray shiny paper. I colored in my lady with the Stamping Up pens and then cut her out. I cut out her dress from the gray paper and glued it to her. I then placed dimentions on the back side and attached her to the card. The banner was cut next and attached at the top. Easy card tol make.
Monday, January 28, 2013
New Cards
I like sharing my blog. I was trying to enter a contest "Challenge" with Art Impressions over the weekend but alas , I don't know all the tricks of connecting my blog to the entry site. I guess I will try again next week. Well to those girls in our Card group that are interested in my designs I will share a few today. The stamp above comes from Art Impressions. I love her. She is a woman who is happy with herself and enjoys life. To start I stamped her on Whisper white card stock and colored her with Stamping Up pens . I then cut her out carefully. I placed her on the front of a card and proceeded to draw the area surrounding her. It is a porch of sorts which is suppose to be along a bayou in South La. I guess it would be more of a dancing area since I included a sign for a dance. I drew in a few cypress trees and some grass and of course "Charlie" the alligator. What place in South La. on a Bayou would not have its own personal alligator?!. If you look carefully you will see that she is on the edge of the wharf extending from the porch. I then put Stamping Dimensions on the back of my lady and placed her there on the wharf. I added the words later "oops" and inside the card I wrote: Sorry I forgot your birthday. Oh don't say you can't draw. Everyone can draw. So what if your tree does not look like mine. How do you know there isn't a tree that looks exactly as you draw it. You are an artist and what you draw is your creation. Have fun. Enjoy.
Saturday, January 26, 2013
Another "container" Money or gift card
I found an interesting design card stock which was bight and colorful. The paper was 12" wide so
I I scored the card stock every 4 inches thus having two score marks. I trimmed about 1/4 of an inch
from the back panel so the flap would fit on the inside of the card. I then selected a "Girlfriend "
stamp set, (the 4 ladies proudly struting) and selected two of the ladies I wanted to use. I covered the
remaining ladies with a piece of card stock and lightly pressed my ink pad over the remaining two
ladies. I colored them in with the wooden crayon pencils and used mineral oil to smooth out the pencil strokes . I then cut them out and put it aside. I cut a scalloped oval in the bright orange and flued the ladies in the center . They overlapped a little which is what I wanted. I used another punch to cut out a phrase rectangle and stamped the words "Lets Celebrate". I then glued the big oval to the outside center of the card and the phrase at the top. I used dimentions for the ladies. On the inside of the card, I cut out a rectangle half the size of the card stock and then punched the half circle at the top. I glued that along the edges and bottom and attached to the center bottom of the card. Over it I cut out two scalloped ovals (spellbinders) and stamped Birthday wishes in the center and added a small butterfly beneath it. To the inside left side of the card I added on of the "golden oldies" which I stamped on white card stock, added a skirt to her bathing suit and put designs similar to the card design coloring everything with wooden crayon pencils and again using the mineral spirits to smooth the crayon. I then glued her to the card. A quick gift idea when you don't know what to purchase for someone.
A GIFT BAG FOR ANY OCCASION
A gift bag is always a quick solution for a gift to someone. If you don't have a box you create your own bag. I like this idea as you can choose the paper to suit the person you are giving it to. On this bag I took a smaller bag that I had handy and took it apart to use as a pattern. I placed it on the selected paper and went to cut it when I realized the paper wasn't quite large enough. Easy solution, I just folded over the side panels to half their size and put it back on the "crossword paper design" I had chosen. I cut out the rectangle a bit taller than the actual bag. I also left the overlap on the side seam to have enough to glue the edge. After the piece was cut out I folded my paper the same as the bag. I then glued the overlap to the side edge. I then folded the bottom portion to form the bottom of the bag. I cut a scalloped oval with the spellbinder(using a light shade of black) and put it aside. I took one of my girldfiend stamps (ladies sharing coffee and cake) and stamped it onto Whisper white card stock from Stampin Up. I made the table cloth have a checkered look like the crossword paper and then colored everything with wooden crayon pencils. I used mineral oil to smooth out the pencil marks . I next cut out the ladies and glued Stampin Up deminsions on the back and stuck it in the center of the black oval. I glued the oval to the bag I had made. I next typed out a greeting and printed it and added it over the oval. I used medium gray tissue paper to fill the bag. You may view the photos above.
Subscribe to:
Posts (Atom)


