Well those of you that know me- for this little monster to be my body guard means he will have a lot to cover! He has maybe grown about a half inch or so and his fur is getting longer. He loves to lick my nose and for some crazy reason he tries to get into my bra when I hold him against my chest. No no no thats not a trait I encourage. He could get lost in there. He follows our other dog everywhere .This afternoon when we took naps he slept behind Sam's left ear near the top of his head. Now there ain't no hair up there so I have no idea why the top of his head was his sleeping spot. Wierd dog. Tux.
 Friday, December 3, 2010
MY BODY GUARD
Well those of you that know me- for this little monster to be my body guard means he will have a lot to cover! He has maybe grown about a half inch or so and his fur is getting longer. He loves to lick my nose and for some crazy reason he tries to get into my bra when I hold him against my chest. No no no thats not a trait I encourage. He could get lost in there. He follows our other dog everywhere .This afternoon when we took naps he slept behind Sam's left ear near the top of his head. Now there ain't no hair up there so I have no idea why the top of his head was his sleeping spot. Wierd dog. Tux. Wednesday, November 17, 2010
PHOTOGRAPHER AND AUTHOR OF LA.1

HERE I AM WITH MR HENRY CANCIENNE:
Photographer of La. 1. He lives near the small town of Lockport La. His photographs have been published in Southern Breeze, Country Discoveries, Country Roads , Jewish Living and in local newspapers and upcoming books.
He signed my edition of the Book La 1. It can be purchased at Cherry's Book Store on Canal Blvd. , Thibodaux.
AUTHOR OF LA 1.

THIS IS ANNE BUTLER : She is the author of a number of books , childrens books, cook books and humor books, hundreds of magazine and newspaper articles. She lives on one of English Louisiana's early plantations, historic Butler Greenwood Plantation. She is signing my book on Nov. 16, 2010. Her book can be purchased at the C herry's Book Store on Canal Blvd. It is very nice and is a photo tour of La. 1 from top to bottom.

MY NEW PUPPY

THIS IS MY NEW PUPPY. HE IS A LONG HAIRED MINATURE CHI. LOOK AT THOSE EARS. HE ALMOST LOOKS LIKE A 747. I CALL HIM TUX BECAUSE HE ONLY HAS WHITE ON HIS CHEST AND THE TIPS OF HIS BACK FEET. HE IS THREE MONTHS OLD .
NOVEMBER PARTY

HAPPY MEMBERS OF OUR GROUP. DIETE BECAUSE SHE WAS THE HOSTESS FOR THIS MEETING AND SUSAN B. BECAUSE SHE IS THE NEXT HOSTESS. LOOKING FORWARD TO THE NEXT MEETING...NEW GOODIES.
NOVEMBER PARTY

HERE DEBRA PRAYS THAT SHE GETS THE INSTRUCTIONS RIGHT FOR THE NEXT ITEM WE WILL BE MAKING. SHE DID WELL SO I GUESS THE PRAYERS WORKED.. HEE HEE
Tuesday, November 16, 2010
SUSAN'S GIFT IDEAS

THIS IS A CUTE LITTLE TRINKET BOX THAT WE MADE , YOU COVER A TIN BOX WITH CRAFT PAPER USING THE CORNER TRIM TO ROUND THE EDGES, DESIGN SIDE PANNELS AND ATTACH RIBBONS AND BRADS BEFORE STICKING TO SIDE WITH DIMENTIONS.
SUSAN'S GIFT IDEAS

HERE SUSAN HOLDS A CANDY BOX SHE PURCHASED AND DECORATED IT WITH SOME CHRISTMAS RIBBON AND ATTACHED A cHRISTMAS TAG. THE BOX HOLDS A GREAT CHRISTMAS TREAT,
SUSAN'S GIFT IDEAS
This is a nice dish towel set wrapped with Christmas
design paper. She tied a ribbon , attached some
buttons and attached some cookie cutters she had wrapped the edges with the same paper. She inserted the wooden spoon after she stamped a Christmas greeting on the handle. Very useful.
design paper. She tied a ribbon , attached some

buttons and attached some cookie cutters she had wrapped the edges with the same paper. She inserted the wooden spoon after she stamped a Christmas greeting on the handle. Very useful.
CHRISTMAS CANDY

These are two large Hershey candy bars wrapped up with a poem attached, decorated with a checkered bow and a set of bells and a pretty christmas brad.
NOVEMBER PARTY

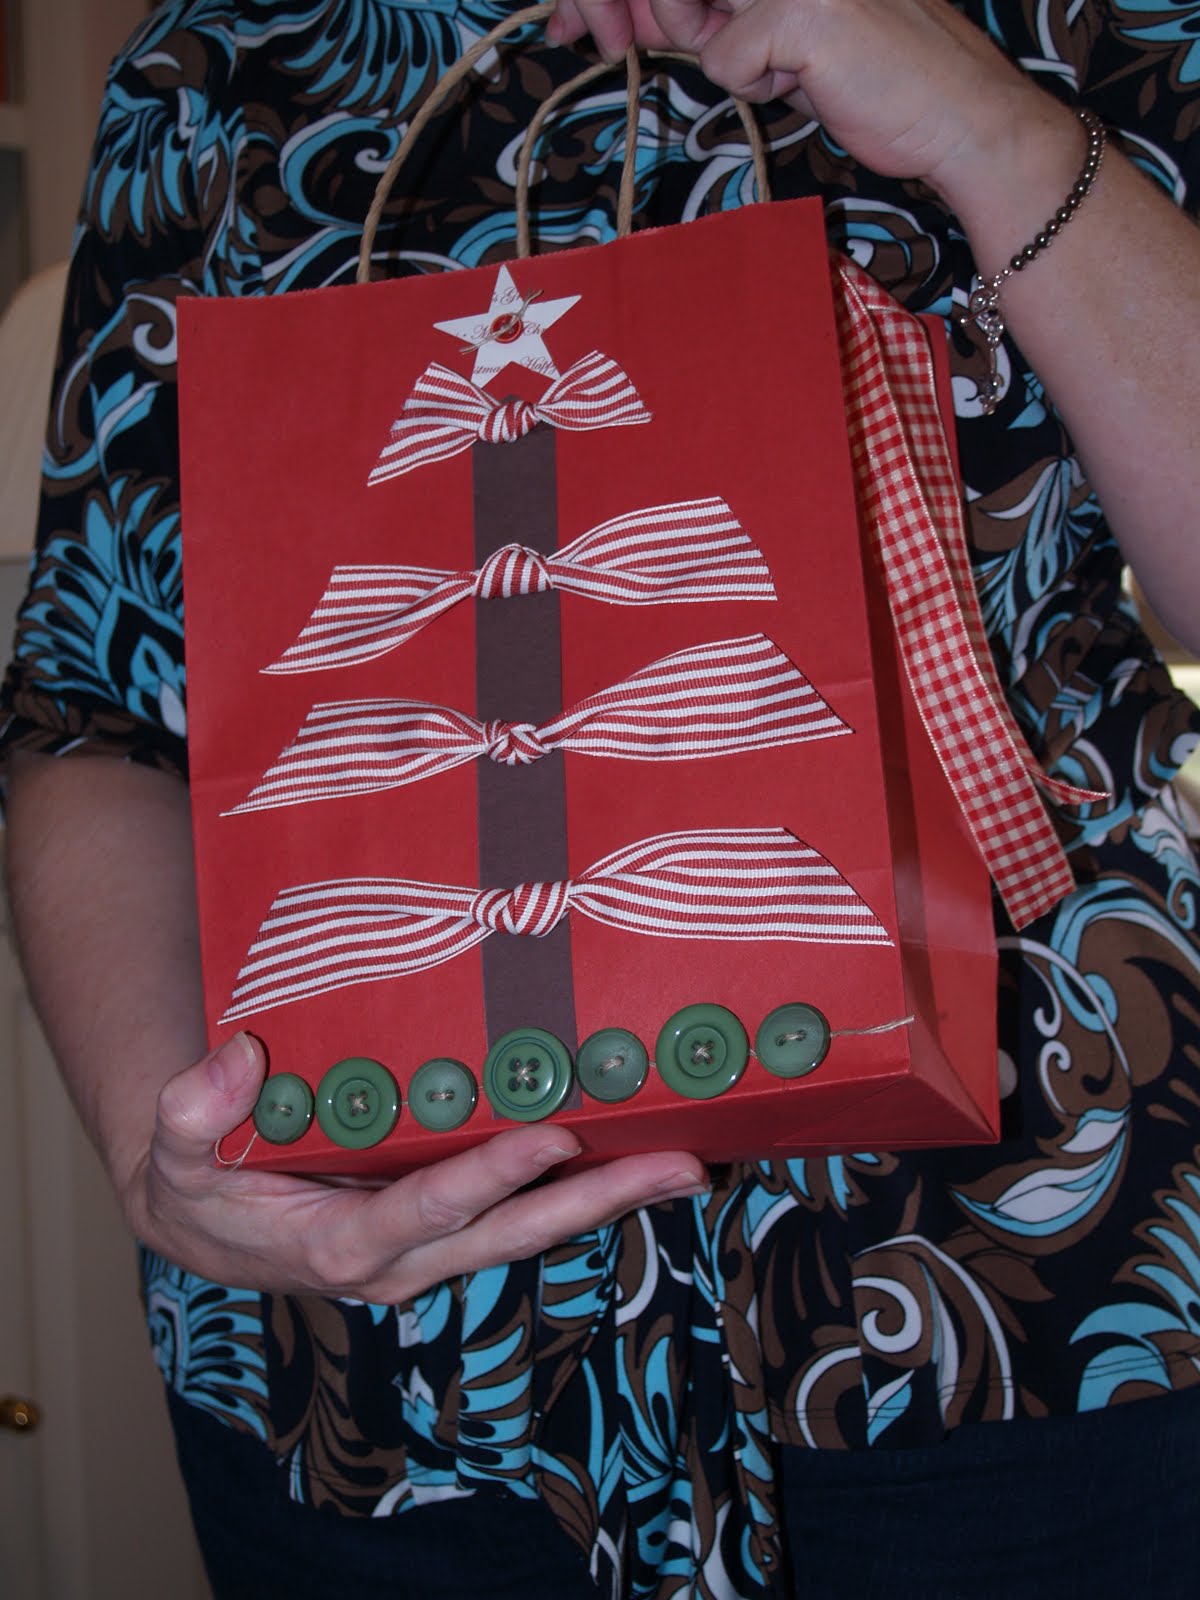
These are two of the gift bags that Susan made to give as gifts to the members . She drew names and then we played the white elephant game or Chinese game which ever you call it.
Tuesday, October 19, 2010
BABY SHOWER

Hello everyone, Sorry I have been away for so long. My daughter had a diagnosis of Stage 3 Melanoma and as you can imagine it threw us for a loupe. I have been staying at her home helping her the past several weeks. She has one more test at MD Anderson this week to check spots that had been on the pet scan she had done. So far one has come out clear of cancer.
This is a card I had a request for this week. The favorite colors are brown and pink. As usual I use my envelope to determine the size of my card. I had a lot in mind for this one .I chose the dark brown as my card base. I would say this card is at least 5 by 8 and 1/16 . I cut a pink card stock to go over that and it was about 1/8 smaller than the brown card . I found a printed brown paper that I liked so I cut that about maybe 4 by 4. (Ya'll are going to have to realize I just eyeball my cards and don't really measure anything.) Anyway I cut a piece of pink paper and a piece of dark brown card stock both 1/8 " shorter than the other. Next came the white and its a bit smaller than the 1/8" measurement. I judged from the stamp itself and I mounted this stamp and I think its 4 by 4. I used SU markers to color the picture. I started gluing the cards together. As you can see I used a punch to make a scalloped border on the brown printed paper. I glued the flowered paper, the pink brown and white card on the bottom half of the card. The white card was mounted with dimensions . On the four corners of the picture I put pink buttons with the med. stick ems . I next cut some strips with the dotted scalloped ribbon punch and made three strips all together. On the computer I printed the words I wanted on the card on card stock and used a scalloped punch to cut them out. I placed the ovals , put brown dots all around them and tucked the scalloped ribbon under each word and glued them in placed with dimensions . At the top of each ribbon I glued a button with the med stick ums and next glued some small plastic safety pins at the top pf each oval. The pink ribbon was attached in the center. Inside the card I put some Pictures I had of a baby and then on the right side I put a pink piece of card stock and stamped Its a Girl on the top left and right and used the embossing powder. That's it. The person was delighted with her card .
Saturday, September 25, 2010
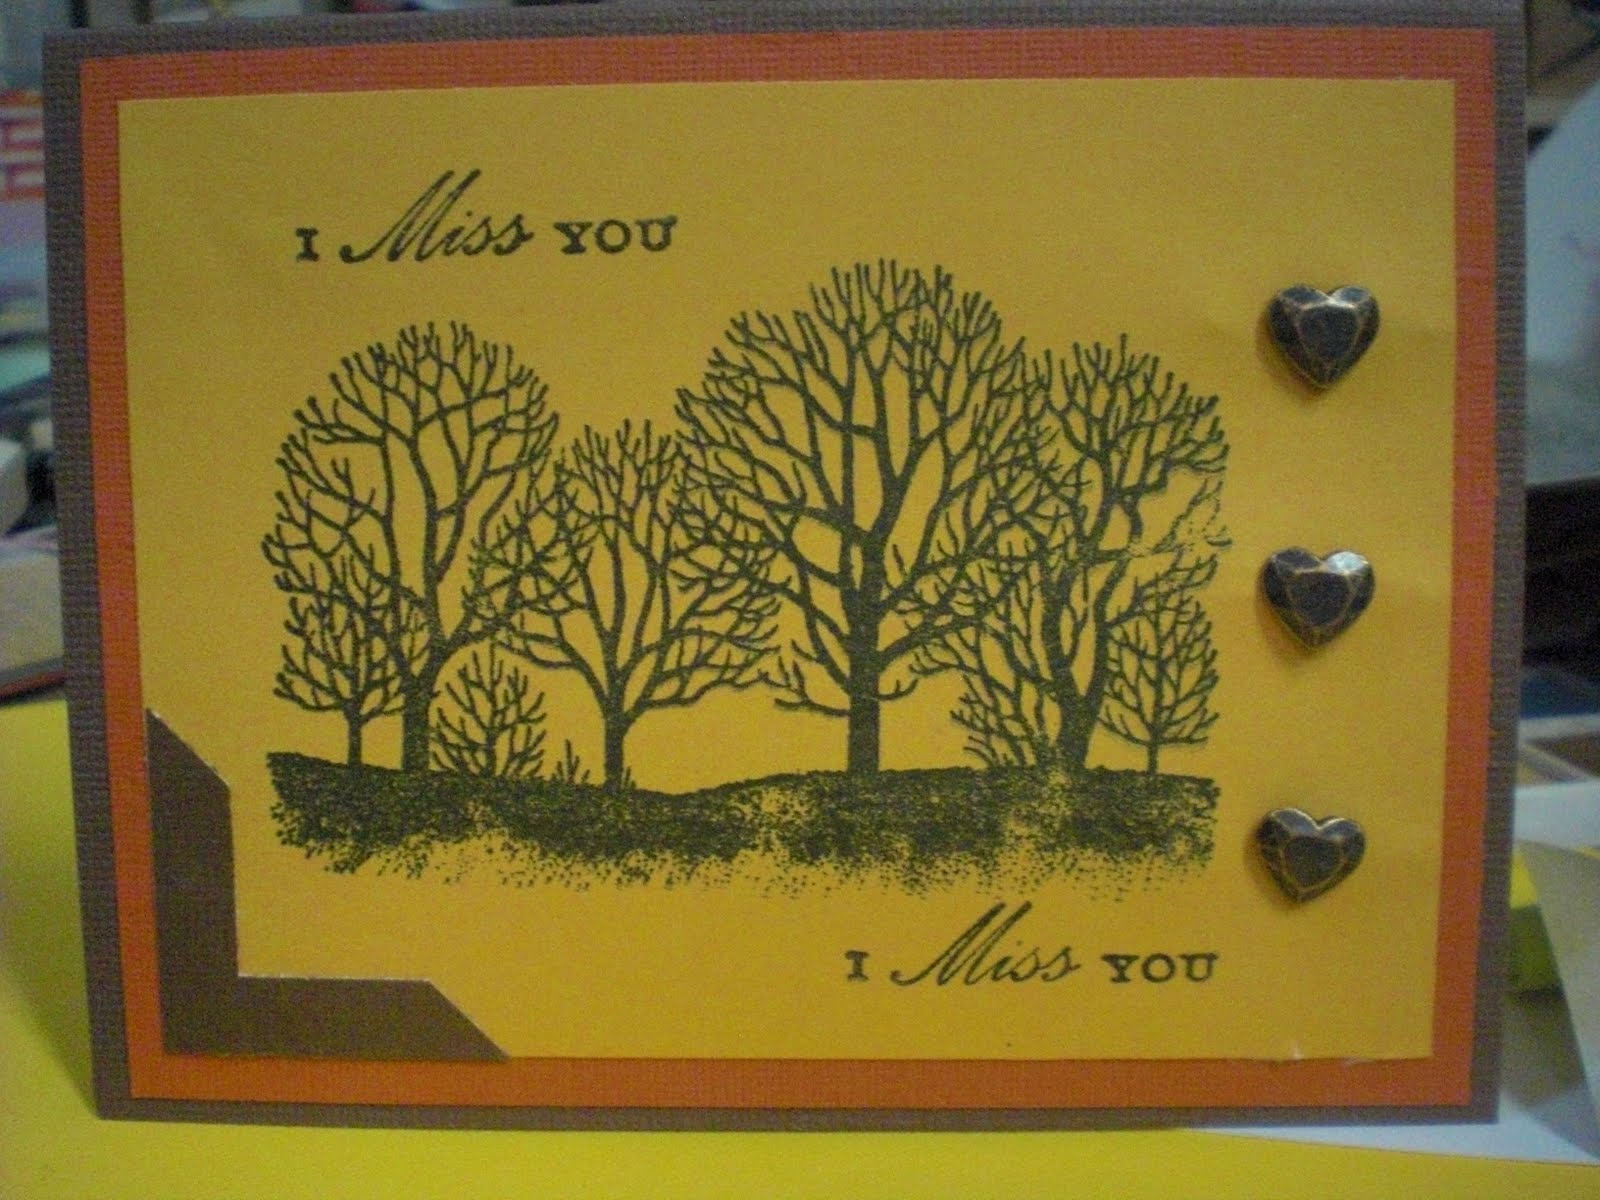
Christmas cards made at our last meeting.


Here are two of the cards that we made at this last meeting. I love both of these. We actually made three but I had not photographed No.3 yet. All of the cards were very well done and would be perfect Christmas cards for family and friends.
1st year anniversary as a stampin up demostrator

Here is our fearless leader. Doesn't the smile say it all. She is delighted to be our leader and celebrating one year as a Stampin-up dealer. Her talent, her patience, her organisational skills are all things we admire about her. She makes our meetings so much fun and sharpens our skills without realizing how great she is. Thank you so much Susan for all your hard work preparing the material for our cards and for taking your time to type out the plans for the meeting . You are very good at what you do.......but those of us that love you knew that already. HAPPY 1ST YEAR ANNIVERSARY.

Friday, September 24, 2010
BABY CHRISTENING CARD

A CHRISTENING CARD
This card was requested by a friend. I used dark pink card stock to make the base of the card. I found a nice floral print to use on the front . I cut two small strips of card stock in a lighter shade of pink and one white. I scalloped the edges with stampin up punches . I placed them at the top of the pink floral paper and at the bottom. I glued two pieces of lace on each side of the pink floral print and on top of that I glued a narrow pink ribbon . I then put the stick- on pearls along the ribbon. Next I cut out the angel stamp, colored her headband and dress in shades of pink and white. I put a pearl on her dress and used dimensions behind her to give depth . In front of her I placed a Scalloped circle pushing it to the waist and putting her hands over the circle. I attached a pink ribbon bow at the top of the circle. After shading the edge of the scallop with a light pink I used pearls again in the scallops. Next I had a cross stamp that I used . I stamped three crosses on different card stock. I then cut each one smaller than the last. In other words I cut the white larger then the dark pink and then the light pink which showed the design on the cross. I next used a brad to hold a metal cross right in the center. The bottom oval (which is slightly off center ) is on dimensions again and pearls on the darker pink background . I glued lace to the bottom of the card using the fold and stick method. Lastly I cut a rectangle tag and placed it in the center with a Christening Blessing.


CARDS FOR SOLDIERS


The soldiers need cards to send home to their family members and friends. We , as a group to send these cards . It is really Susan Gautreaux's idea and is one of her favorite projects . These cards are the ones that I made. The one on the right is with a the cuddle bug. It is one of the folders and after stamping it, I colored it using the color pens.

These were simple cards and are for your viewing. I am going to add a few more. I did not photograph all of them though as it was 51 cards all total.
Sunday, August 22, 2010
FIREMAN BIRTHDAY CARD.

This is a Fireman's Birthday card for my nephew. It is not complicated but does take some planning. I put it together as I went so it was not planned. It was trial and error. I cut the card out of yellow card stock. Don't ask measurements . Its exactly 1/4 " smaller than the envelope I will put it in. Next I stamped my cute little Fireman (that belongs to Susan) and I colored him with a yellow pencil color and the chest panel, cuffs and his boots black with the pencil. I then cut another helmet and cuffs to add with dimentions to create two dementional effect. I then used chalk to do in the background with orange, yellow , red and some puffs if black. It gives the impression of smoke and fire. I cut two other pieces of card stock , one yellow and one black and then put the three together with black brads. I knew I wanted to use some metal loops that I had so I found the black ribbon with white stiching marks on it and attached the metal loops under the pictures to the right. Then I wrapped the ribbons around the other half of the loop and then wrapped it around the piece of black background and tucked the end under the picture. I then glued the black card and the picture to the yellow card stock. I cut rectangle black card stock to highlight the yellow birthday wishes which was cut with craft scissors. It all came together better than I hoped. The next view is the inside of the card.
FIREMAN BIRTHDAY CARD
This is the inside of the card. It was simple. I printed the verse on my computer on white card

stock and cut the edges with the craft scissors. I then brushed on red ink around the edges. The cake (both layers and the candle ) comes from another greeting card set that I had on hand. I just had to use it on this one. It all came together perfect.
Tuesday, August 17, 2010
GET WELL CARDS


Here are two get well cards . One on the left has the coffee cups or tea cups cause my neighbor lijes tea and coffee. Does the one on the right look familar? Hee hee. Well she was laid up with a bum knee. Both are simple cards. I used textured card stock, stampin up pens and chalk, brads bows and three stamps. One is the flowers you see near the coffee cup'. I just stamped them to match the flowers on the card underneath.
I also dusted the edge of the card with blue to bring out the cups. It is layered and most of you know how to put the card together. Both are doing well by the way. I'm tired tonight so I'll just some quick typing and hopefully get to bed early. My truck is still sick and Gonzo is bringing me to work. Later ya'll.
Monday, August 16, 2010

Hi ya'll. Well this was one of my latest projects. I had a couple of birthdays at the end of July and the begining of August. This one was for my nephew Chad. He likes race cars and even though I did not have a fashionable racer I was able to use this older model and just add some color. It is not difficult. I used a brown textured paper for the card itself and then cut a smaller piece of green that I edged with some brown color. I then attached another designed card stock and placed it on a strip of dark green and placed it all onto the lighter green background. I added the brads on the white card stock and also did some shading with some brown . I attached brown buttons on the top and stick on letters at the bottom . The Happy Birthday was stamped with versa mark and then embossed with the gold embossing powder. I have several birthday cards that I have to finish for family members and for some special people. Today was a long day. My car overheated (which seems to be happening regularly lately). I then had to return home for lunch cause I had forgotten to deliver an item to a lady in Labadieville this morning. My grandson started Pre K today and I was concerned as to how he would handle it. No worry -- he did great . I then had the car over heat again going back to work Grrrrrrrr!!. Had to call Gonzo to come check it. Then after work I had 50 lbs of shrimp to dehead and put in the freezer and now I have a about 35 minutes of typing to get done before bed. I hope to add other cards during the week to my little blog. I hope to get some scrapbooking done soon and will show those pages also.
Friday, July 30, 2010
WELCOME BABY

Now if you ladies /or guys don't just love this darling little girl , well then you are just not into children. I designed the card as I worked on it. A friend needed the card for a baby shower and knew it was a girl. I came up with what you see. I have this beautiful baby stamp and I used stampabilities to cut the part she is on. After I stamped it , I colored the picture with chalk using a small paint brush. My stamp is not mounted yet so it was quite tricky to get it right. I used a piece of paper from a stack pack for the pink background and cut that to from a design for the big kick (which I forgot and used the cuttle bug) I then glued some white rick rack I had and next placed the solid pink ribbon across the card. I had the little crown brads from Michaels and added them to the corners of the background paper I glued her picture in the center by using dimentions. I placed pearls only on the side of her photo on the back ground . I cut the circles or rather ovals with punches and on my typewrite typed the wording I wanted. I surrounded the ovals with pearls. I glued that with dimentions also. Right under that went the bow and then I found the cute pink buttons and added them to the corners. I put two green brads on the ovals being her out fit is green. Inside I used the same background paper and added two punch card writting notes. One says ITS A GIRL and the other I left for the giver to write her note and name. I also used diamond glaze on the bubbles to make them shine and there it is, All done
Wednesday, July 28, 2010
FAREWELL CARD


The picture on the left shows how I wrapped the string through the brads and the on one I attached a small suitcase and on the other a small key. Note that the envelope is the same paper as the back of the card and I placed the circle brads on the flap and on the envelope so it could be tied closed. It really came out very nice.
FAREWELL CARD
 This is the back side of the card. Just used a few stick ons. Each page has the fold line on the edge. They were all scored alike so that they would fold when all put together. I used the circle brads to connect the pages. I put 4 of them . I then stung some of the rope string through two holes and tied that section together leaving a short part of the string hanging. I 'll have a close up of this on the next set. I did the same thing at the bottom of the card. That completed the card.
Pages number 3 and 4
 Here we go with the back of the second piece of card stock and the last page which is card stock piece numnber 3. Page number 3 is really the back side of card stock number 2. I did not cover the design . Instesad I cut another piece of card stock to match the print in the design and I cut it to be a little less than half the card. I used a punch and put the Fleur De Les on the edge. I glued the three sides to fit the page and I used it as a pocket. I stamped a verse on the top above the pocket and then glued some stick ons to the outside of the pocket. I put a collection of stamps in the pocket. The last inside page has a design of a news paper print. I stamped the Warmest wish and then a copy of the Lord's prayer and a tag of a typewritter meaning don't forget to write.
 This is the second and third page of the card. Actually the second page is the back of the cover. I used a travel design scrapbool paper as the back ground. On top of that I put a small narrow page with lines for writting notes. I also put a stick on circle that looked like a post mark and the stick on at the bottom of that page has a hand holding a writting pen The third page is another piece of textured card stock that I cut the same dimentions as the first card. I applied a piece of paper that had a portion of a world map as the back ground and then added some travel stamps. I also later added a note saying how we would miss this person I stamped a small verse pertaining to God.
GOING AWAY CARD

A friend asked me to make a "Going away " card. I happened to view a card on Splitcoaststampers that looked really neat. Its not really a card but more like a small journal or travel book. I thought I'd try it. I cut some textured card stock about 7 and 1/2 inches long and about 5 inches wide. I scored one side about a little over a fourth of an inch. I then layered another craft paper on top of that. I stamped some background designs randomly and used other stamps also . I then used stick ons with nice sayings. You can see where I added a small suitcase. That was the first page and the cover for the card.
Monday, July 26, 2010
STORIES FOR THE PHOTOS BELOW
Here we go .....the story of the pictures below. Lets start with the craft room. I so admired the way Susan set up her craft room that I had to try finding a way I could use the shelf unit. I could not fit the three shelf unit but could probably use the two column. I bought one at Lowes and then I saw the shoe storage unit and purchased that to hoping I could use it. I put the units together and then placed the large unit lying sideways on top of my table. Then I put the shoe rack together and put it on top. I noticed that the back of the storage unit had these card board panels to seal off the back . Being that having the unit on the table it would block my view of the entrance door so I cut each card board in half and nailed half to the openings. By accident I saw a piece of vellum and thought if I could use a clear plastic I could provide a backing for the shoe rack that I could see through. Well the plastic divider from the storage paper folder was perfect and I cut two to fit . I used some of my stamps to put designs on the plastic and glued scrapbook paper onto the cardboard to make it attractive from the entrance side. It has worked perfectly and now everything is right at my fingertips. Oh I can still make the worse mess your ever saw when I am really into a project but its not as hard to clean it all up
MORE CARDS;
I made a fall card to send to the soldiers. By the time they received them Fall and Christmas will be here. There is another view of the new work area.
PASSING TIME:
The wheel barrow card is for the service men and the other is for my son's birthday in August. He loves to hunt so he likes the outdoors . This card was done in chalks.
HAPPY BIRTHDAY:
These are cards I made for two of my relatives. One likes race cars and the other likes old cards. Its a father and son team and lets say they both like the same things.
So that is my upload for the day. I have been having a lot of fun creating a lot of the cards. I just received some new stamps I ordered the other day. I also have my Stampin Up stamps that I love. I could do this all the time. I really enjoy the heck out of it.


Sunday, July 18, 2010


Subscribe to:
Posts (Atom)