Friday, July 30, 2010

WELCOME BABY


Now if you ladies /or guys don't just love this darling little girl , well then you are just not into children. I designed the card as I worked on it. A friend needed the card for a baby shower and knew it was a girl. I came up with what you see. I have this beautiful baby stamp and I used stampabilities to cut the part she is on. After I stamped it , I colored the picture with chalk using a small paint brush. My stamp is not mounted yet so it was quite tricky to get it right. I used a piece of paper from a stack pack for the pink background and cut that to from a design for the big kick (which I forgot and used the cuttle bug) I then glued some white rick rack I had and next placed the solid pink ribbon across the card. I had the little crown brads from Michaels and added them to the corners of the background paper I glued her picture in the center by using dimentions. I placed pearls only on the side of her photo on the back ground . I cut the circles or rather ovals with punches and on my typewrite typed the wording I wanted. I surrounded the ovals with pearls. I glued that with dimentions also. Right under that went the bow and then I found the cute pink buttons and added them to the corners. I put two green brads on the ovals being her out fit is green. Inside I used the same background paper and added two punch card writting notes. One says ITS A GIRL and the other I left for the giver to write her note and name. I also used diamond glaze on the bubbles to make them shine and there it is, All done
Wednesday, July 28, 2010

FAREWELL CARD


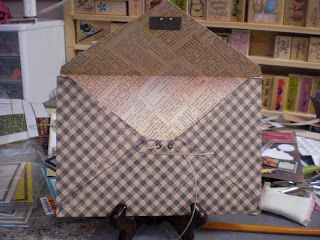
The picture on the left shows how I wrapped the string through the brads and the on one I attached a small suitcase and on the other a small key. Note that the envelope is the same paper as the back of the card and I placed the circle brads on the flap and on the envelope so it could be tied closed. It really came out very nice.

FAREWELL CARD

This is the back side of the card. Just used a few stick ons. Each page has the fold line on the edge. They were all scored alike so that they would fold when all put together. I used the circle brads to connect the pages. I put 4 of them . I then stung some of the rope string through two holes and tied that section together leaving a short part of the string hanging. I 'll have a close up of this on the next set. I did the same thing at the bottom of the card. That completed the card.

Pages number 3 and 4

Here we go with the back of the second piece of card stock and the last page which is card stock piece numnber 3. Page number 3 is really the back side of card stock number 2. I did not cover the design . Instesad I cut another piece of card stock to match the print in the design and I cut it to be a little less than half the card. I used a punch and put the Fleur De Les on the edge. I glued the three sides to fit the page and I used it as a pocket. I stamped a verse on the top above the pocket and then glued some stick ons to the outside of the pocket. I put a collection of stamps in the pocket. The last inside page has a design of a news paper print. I stamped the Warmest wish and then a copy of the Lord's prayer and a tag of a typewritter meaning don't forget to write.
This is the second and third page of the card. Actually the second page is the back of the cover. I used a travel design scrapbool paper as the back ground. On top of that I put a small narrow page with lines for writting notes. I also put a stick on circle that looked like a post mark and the stick on at the bottom of that page has a hand holding a writting pen The third page is another piece of textured card stock that I cut the same dimentions as the first card. I applied a piece of paper that had a portion of a world map as the back ground and then added some travel stamps. I also later added a note saying how we would miss this person I stamped a small verse pertaining to God.

GOING AWAY CARD


A friend asked me to make a "Going away " card. I happened to view a card on Splitcoaststampers that looked really neat. Its not really a card but more like a small journal or travel book. I thought I'd try it. I cut some textured card stock about 7 and 1/2 inches long and about 5 inches wide. I scored one side about a little over a fourth of an inch. I then layered another craft paper on top of that. I stamped some background designs randomly and used other stamps also . I then used stick ons with nice sayings. You can see where I added a small suitcase. That was the first page and the cover for the card.

Monday, July 26, 2010

STORIES FOR THE PHOTOS BELOW

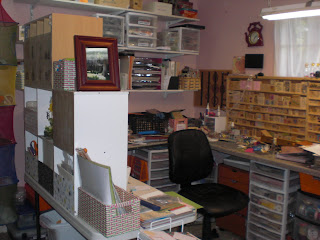
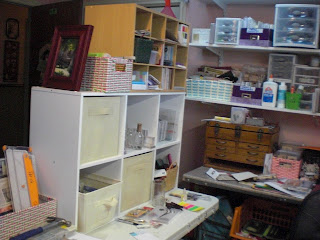
Here we go .....the story of the pictures below. Lets start with the craft room. I so admired the way Susan set up her craft room that I had to try finding a way I could use the shelf unit. I could not fit the three shelf unit but could probably use the two column. I bought one at Lowes and then I saw the shoe storage unit and purchased that to hoping I could use it. I put the units together and then placed the large unit lying sideways on top of my table. Then I put the shoe rack together and put it on top. I noticed that the back of the storage unit had these card board panels to seal off the back . Being that having the unit on the table it would block my view of the entrance door so I cut each card board in half and nailed half to the openings. By accident I saw a piece of vellum and thought if I could use a clear plastic I could provide a backing for the shoe rack that I could see through. Well the plastic divider from the storage paper folder was perfect and I cut two to fit . I used some of my stamps to put designs on the plastic and glued scrapbook paper onto the cardboard to make it attractive from the entrance side. It has worked perfectly and now everything is right at my fingertips. Oh I can still make the worse mess your ever saw when I am really into a project but its not as hard to clean it all up

MORE CARDS;
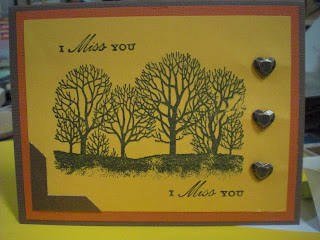
I made a fall card to send to the soldiers. By the time they received them Fall and Christmas will be here. There is another view of the new work area.

PASSING TIME:
The wheel barrow card is for the service men and the other is for my son's birthday in August. He loves to hunt so he likes the outdoors . This card was done in chalks.

HAPPY BIRTHDAY:
These are cards I made for two of my relatives. One likes race cars and the other likes old cards. Its a father and son team and lets say they both like the same things.

So that is my upload for the day. I have been having a lot of fun creating a lot of the cards. I just received some new stamps I ordered the other day. I also have my Stampin Up stamps that I love. I could do this all the time. I really enjoy the heck out of it.

THE PLAYROOM


MORE CARDS


PASSING TIME


HAPPY BIRTHDAY


Friday, July 16, 2010

WELCOME BABY


HOW IS THIS LITTLE CUTTIE. I LOVE THIS STAMP. THIS CARD WAS EASY TO MAKE AND I HAVE USED HER IN MANY SETTINGS. I USED THE PINK CARD AS THE BASE AND THEN CUT IN LAYERS THE YELLOW, PINK AGAIN AND THEN WHITE. ON THE WHITE CARD STOCK I STAMPED "CAITLYN" AND DID A SECOND STAMPING ON ANOTHER EXTRA PIECE OF WHITE CARD STOCK SO I COULD CUT OUT THE HAT SHE IS WEARING. I COLORED HER USING CHALK AND THEN STAMPED THE DUCK TO HER RIGHT (MY LEFT) AND DREW THE WIND UP PART MYSELT TO MAKE IT A TOY. THE REST WAS SIMPLY PRINTING THE WORDS ON MY COMPUTER CUTTING THEM WITH PUNCHES AND THE GLUING ONE ON TOP OF THE OTHER. I CUT OUT HER HAT FROM THE SECOND CARD STOCK , COLORED IT AND ADDED A VERY TINY PIECE OF LACE UNDER THE EDGE OF THE BONNET AND SOME PEARLS IN THE CENTER OF THE FLOWERS. I ATTACHED THE HAT USING DIMENTIONS AS I DID NO THE VERSES. ON MY PINK CARD STOCK I USED A PUNCH TO PUT THE DESIGN ON THE EDGE OF THE CARD AND PLACED THE WHITE CARD STOCK IN THE CENTER OF THAT. I THEN GLUED THE PINK TO THE YELLOW-ATTACHED THE PINK RIBBON AND GLUED IT ALL TO THE PINK CARD. INSIDE I GLUED A PRINTED PINK LAYER OF CARD STOCK AND A WHITE IN THE CENTER OF THAT FOR WRITING A GREETING. I STAMPED A BABY RATTLE ON THAT AND ON THE FLAP OF THE ENVELOPE.

Monday, July 12, 2010

FEAUX SEWING CARDS ,,,,FAN MAIL


This is one of the cards we made. It is a quilting stitch design that we do on the card that makes it look like it is really sewn together. It has a great effect. You are learning the art of sewing and piercing cause you pierce the holes where you want the stitches to go. You can see the guide for the matt pack that we used to make the piercing for the stitch . Buttons were glued on after having a piece of embroidry floss strung through and tied in a not. It was cute and so neat looking. It actually looked sewed together. Great project Susan. Another skill learned.
Working hard


Here Linda is working very carefully on her card. Linda has great color skills and great ideas for cards. She does beautiful work on her own. She will be hosting the party in September and of course none of can wait for the next meeting. This group of ladies fit like the pieces of a puzzle all with different personalities and life styles and even with all the angles and ups and downs we all fit together nicely . Debra seems to be concentrating hard herself on her project, I think this is the pleated ribbon card. My flash distracts Debra but lets me catch up with the group. Ha.

MONA WATCHING AND FOLLOWING INSTRUCTIONS


Mona does great work and alway shares her projects. She is very creative and takes her time when putting her ideas together. Her patience and skills makes her work very special. She is also great for a few laughs. Our group would not be complete without her. I like her designs and her garage sale specials. We all wait to see her latest creation. She met Mary at the garage sale . A great way to meet new people and make friends. Isn't it great how other peoples trash become our treasures. I love garage sales.

ALL PAYING ATTENTION TO THE LEADER


Here is one view of the group. Mary is in the striped shirt. She was a wonderful guest and we enjoyed her company and participation . I think I have the names of everyone shown, Deit , Mary, Mona , Sue , Earline , Debra, Linda and our leader Susan. I'm smart.....I'm taking the pictures. We are all following Susan's instructions. Earline appears to be stamping an image on a piece of cardstock. We all come well prepared having all the tools that we need to use. What we don't have we share or borrow.

EARLINE SERVED A FEAST


Earline outdid herself with the feast she had prepared for us. She had potatoe salad made from potatoes she grew in her garden, eggplant casserole (to die for), a shrimp mold, roast , wheat buns crackers and dips ,cake and strawberries, rasberry green tea, lemonade, coke . We were to full to move from the table . Good thing we had to do our work there. It was all awesome and greatly appreciated. Gotta give it to her ....the woman can cook. Thank you Earline.

THE PLEATED RIBBON CARD.


WE were taught so well. Here is my card that I completed. The flower is stamped on white card stock and glued to the purple cardstock. The ribbon is pleated at the bottom of the large rectangle cardstock and a piece of string is threaded around the pleating and knoted through a button to hold the pleats facing one way. Then you glue to square card to the rectangle one and the rectangle one to the purple card. Isn't it beautiful. Our demonstrator likes to give us a challenge and to teach us something new each meeting.

JULY MEETING AT EARLINE THERIOT'S


Here is our beloved leader again. Such a good instructor. She is showing us how to pleat a ribbon onto a card. We were to take a strip of sticky tape (on both sides) and glue it to one side of the card overlapping the edge of only one side. That was so when you put the card down your work did not stick to everything on the table. Then you take your ribbon and overlap it on that one side and start your pleats from that end pressing the ribbon onto the sticky tape and then starting a second pleat always pressing the folded edge against the sticky tape and continue to the edge of the card choosing the width of the pleates yourself. I will show the card we used this on later in this presentation.

Wednesday, July 7, 2010

THANK YOU VERY MUCH


I MADE THIS CARD FOR THE PARK RANGERS IN NATCHEZ STATE PARK IN MISSISSIPPI. WE SPENT THE WEEKEND THERE A COUPLE OF WEEKENDS AGO AND HAD AN ADVENTURE. MY HUSBAND GOT LOST IN THE PARK AT NIGHT AND I HAD TO CALL THE RANGER TO PLEASE CHECK WHERE HE WAS. THEY WERE SO HELPFUL AND WILLING TO GO OUT OF THEIR WAY WITH NOT ONE BIT OF AGGRAVATION OR ANGER. THEY WERE SO PATIENT AND HELPFUL. I HAD TO SEND THEM A CARD TO SEND THEM MY THANKS. I USED THE TAN CARD STOCK AND FOLDED IT IN HALF. I TRIED TO KEEP IT SIMPLE. I CUT A PIECE OF PLAIN CARD STOCK AND STAMPED SOME TREES . THEN I USED A LIGHT LIGHT GREEN TO STAMP A TALL FIR TREE. ON A PIECE OF TAN I STAMPED A PICTURE OF THE DOE AND HER FAWN, I SHADED THE DOE AND FAWN WITH CHALK. I LAYERED A PIECE OF RIBBON ACROSS THE MAIN CARD AND THEN PLACED THE INDIVIDUAL PIECES OFF SET OF EACH OTHER. I ATTACHED THEM WITH BRADS AND TUCKED TWO PIECES OF RIBBON UNTER THE PLAIN CARD STOCK TO ACCENT THE OTHER PICTURES. I THEN STAMPED THE WORDS THANK YOU AND VERY MUCH , ONE ON THE TOP AND THE BOTTOM OF THE CARD.
INSIDE I ATTACHED MY LETTER THANKING THEM FOR THEIR UNSELFISH SERVICE TO THE PUBLIC THAT COMES TO THEIR PARK FOR RECREATION.

HAPPY BIRTHDAY FOR A SISTER

THE SISTER THAT THIS CARD IS FOR LIKES THE BEACH, SUN AND SAND. I HAPPENED TO HAVE THIS BLUE GRAY CARD STOCK AND MATCHING PAPER SO I DESIGNED MY

CARD FROM THAT. I MADE THE CARD IN THE BLUE GRAY. NEXT I CUT A PIECE ABOUT A QUARTER OF AN INCH SMALLER IN THE PRINTED PAPER. AGAIN I CUT ANOTHER BLUE GRAY PIECE -AGAIN A QUARTER OF AN INCH SMALLER. I HAD A LIGHT TAN CARD STOCK THAT MATCHED THE ENVELOPE AND THE BACK GROUND OF THE DESIGNED PAPER. I CUT ONE RECTANGULAR STIP OF THE PRINTED PAPER TO FIT THE WIDTH OF THE CARD. NEXT I CUT TWO THIN STRIPS TO LAYER ACROSS EACH OTHER ACROSS THE TOP OF THE CARD. I STAMPED THE LITTLE SANDLES ACROSS THE TOP OF THE CARD . I GLUED THE RECTANGULAR STRIP UNDER THE SANDLES . I STAMPED THE BEACH UNBRELLA AND CHAIR NEAR THE BOTTOM LEAVING ENOUGH ROOM TO MAKE A BEACH EFFECT. I STAMPED THE HAPPY BIRTHDAY ABOVE THE UNBRELLA STAMPING. I STAMPED THE SET ON THE DESIGN PAPER AND THE BLUE GRAY CARD STOCK SO THAT I COULD USE THE PARTS FOR THE UNBRELLA AND CHAIR. I USED THE PRINT FOR THE TOP OF THE UNBRELLA AND THE SOLID FOR THE UNDERSIDE OF THE UNBRELLA. ON THE CHAIR I USED THE PRINT TO MAKE A DESIGN IN THE BEACH CHAIR . I USED CHALK TO MAKE THE WATER AND THE SAND, BLENDING THE COLORS. I ALSO DID THE SAME WITH THE SUN AND SKY. . I ATTACHED TWO CHARMS TO THE CARD, A STARFISH AT THE CROSS MARK OF THE THE BLUE STRIPS AND THE SMALL SAIL BOATS ON THE BOTTOM OF THE CARD. THE INSIDE GREETING IS ON THE TAN CARD STOCK OVER THE PRINTED PAPER. I ALSO USED STAMPS OF A CRAB, SANDLES, FISH AND A BIRTHDAY GREETING. I LIKE DESIGNING MY OWN CARDS AND JUST WORK WITH SOME CARD STOCK IN FRONT OF ME AND GO FROM THERE.